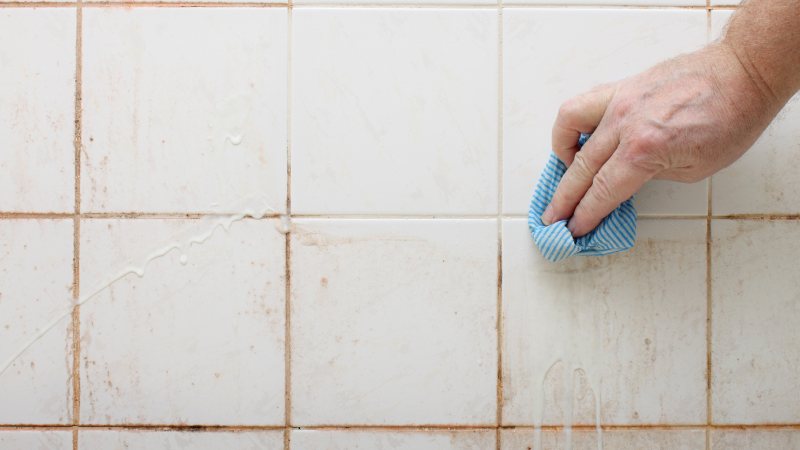
Shower tiles—beautiful, sleek, and functional—can quickly become a magnet for soap scum, hard water stains, and mildew. Despite the constant rush of water, they often lose their luster, making your bathroom feel more “grime central” than a spa retreat.
The idea of scrubbing away at dirty grout lines and tiles during your weekly cleaning might sound like a chore, but it’s worth the effort to keep your bathroom looking fresh and inviting.
With the average person using their shower 6–7 times a week, regular cleaning is key to preventing that pesky buildup.
In this post, we’ll show you smart, effective ways to clean your shower tiles without breaking a sweat—and when it’s time to call in the pros for a deep clean. Ready to reclaim your shiny, fresh tiles?
Let’s get started with a few drops of cleaning solution!
Essential Supplies to Have on Hand
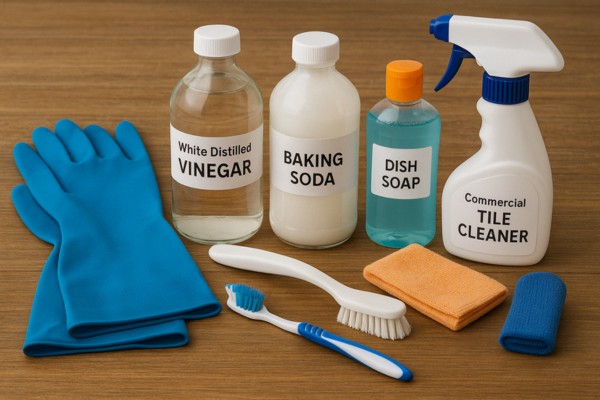
Before you tackle those stubborn shower tiles, it’s important to gather the right tools and cleaning supplies. Here’s what you’ll need to get started:
- White distilled vinegar
- Baking soda
- Hydrogen peroxide
- Dish soap
- Commercial tile cleaner
- Spray bottle
- Scrub brush or old toothbrush
- Microfiber cloth or sponge
- Grout brush (if possible)
- Gloves for protection
With these supplies in hand, you’ll be ready to tackle your shower tiles like a pro!
7 Methods to Clean Shower Tiles
1. Use Vinegar and Dish Soap for Daily Maintenance
When it comes to keeping your shower tiles in tip-top shape, a simple, everyday solution can go a long way. White distilled vinegar is an effective, natural cleaner that dissolves mineral deposits and breaks down grime.
Combined with dish soap, which helps cut through soap scum and oils, you have a powerful, non-toxic cleaning duo.
To use, mix equal parts white vinegar and dish soap in a spray bottle. Spray the mixture generously over your shower tiles, making sure to target areas prone to buildup like the grout lines. Let it sit for 10–15 minutes to allow the solution to work its magic.
Afterward, grab a soft brush or sponge and gently scrub the tiles. Rinse thoroughly with warm water to reveal gleaming surfaces.
This method not only cuts through soap scum and body oils effectively but does so without harsh chemicals.
It’s a great daily or every-other-day cleaning habit to integrate into your routine to wipe away buildup and keep your shower sparkling.
For example, after a long day, you could spritz the tiles with this mixture, let it sit while you unwind, and then come back to find a cleaner, fresher shower with minimal effort.
A small step like this, done regularly, makes a big difference in maintaining that “fresh out of the spa” feel every time you shower.
2. Baking Soda Paste for Spot Cleaning and Stains
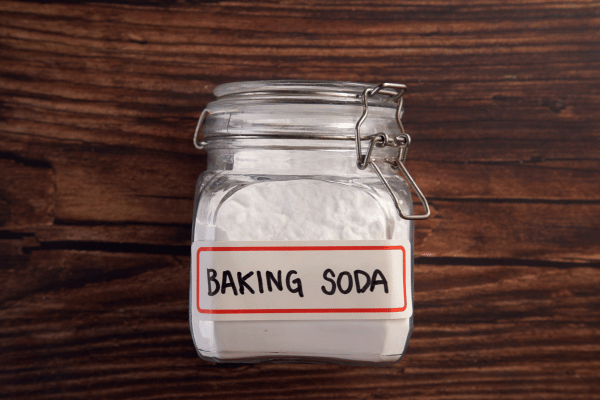
Sometimes, the best solution is hiding in your kitchen cabinet.
If you’re dealing with stubborn stains or stained grout, look no further than baking soda. This trusty kitchen staple is mildly abrasive and can work wonders on those hard water spots and surface grime that seem to cling to your tiles.
To get started, mix a few tablespoons of water with baking soda until it forms a thick paste. Apply the paste directly to the stained or dirty areas on your tiles and grout.
Let it sit for about 15–20 minutes—this gives the baking soda time to lift the stains and tackle the dirt. Once it’s had a chance to set, grab a brush or sponge and scrub away. Rinse thoroughly with warm water to reveal a cleaner, fresher shower.
For instance, if you’ve noticed a buildup of soap scum around your shower’s corners or stains from hard water, baking soda will help you get those spots spotless.
It’s perfect for tackling those pesky areas where dirt tends to settle and hide. With just a little elbow grease and a few minutes, your shower tiles will shine like new again.
Adding this quick spot-cleaning method into your shower routine is an easy way to maintain a pristine look without the hassle of scrubbing every inch of the tile.
3. Hydrogen Peroxide for Mold and Mildew on Tile and Grout
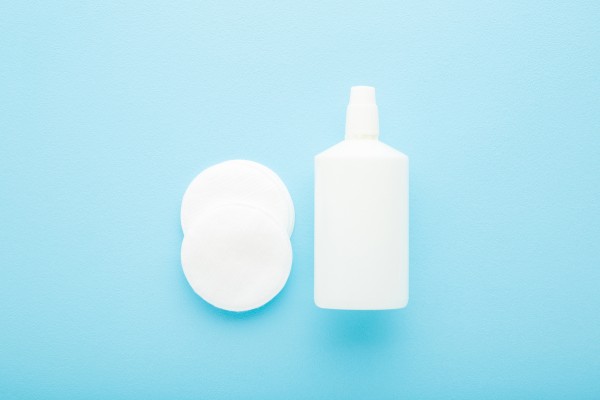
If your shower has seen better days and you’re noticing a little greener than you’d like in the grout lines, it might be time to bring in a heavy hitter: hydrogen peroxide.
This powerful compound is commonly found in professional cleaning solutions, so you can trust it to get the job done right. It’s your secret weapon for tackling mold and mildew that tends to settle in the corners and grout of your shower tiles.
To use, spray 3% hydrogen peroxide directly onto the affected areas, particularly in the grout lines and corners where mold and mildew are most likely to hide.
Let it sit for 10–15 minutes, allowing the hydrogen peroxide to break down the mold and mildew. Then, grab a grout brush or an old toothbrush to scrub away the remnants.
Rinse thoroughly with warm water, and watch as your tiles and grout brighten up, leaving no trace of the unsightly buildup.
As always, take care to test it on a small, inconspicuous area first—especially if you have dark grout or colored tiles—just to make sure it doesn’t cause any discoloration.
But with the right precautions, this method can leave your bathroom looking fresh and mildew-free.
4. Use a Steam Cleaner for Deep Cleaning (If You Have One)
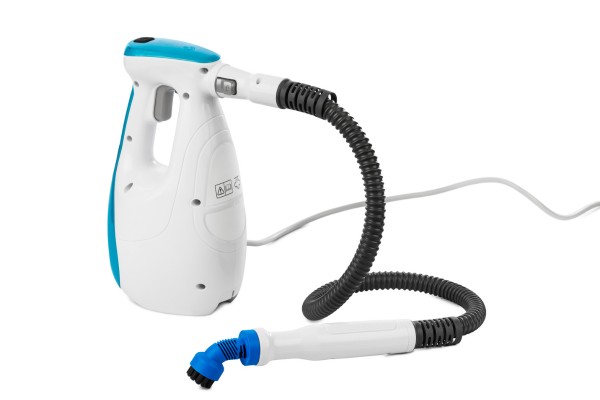
If you’ve got a steam cleaner tucked away in your closet, now’s the time to pull it out and let it work its magic.
Steam cleaning is one of the most effective ways to deep clean shower tiles, as it lifts dirt, bacteria, and grime without the need for harsh chemicals. It’s the ideal solution when you’re facing heavy buildup or when your shower has been a little neglected over time.
Simply follow your steam cleaner’s instructions and start by focusing on the tile and grout areas. If you have grout-specific nozzles, make sure to use them—they’re designed to get into those tiny spaces and clean where dirt loves to hide.
The steam will penetrate deep into the surfaces, breaking down tough stains and sanitizing without any scrubbing required.
Steam cleaning is a powerful way to keep your tiles and grout looking like new with minimal effort. So, if you’ve got a steam cleaner in your arsenal, don’t hesitate to use it for a quick but thorough refresh!
5. Try a Commercial Tile Cleaner (for Stubborn Grime)
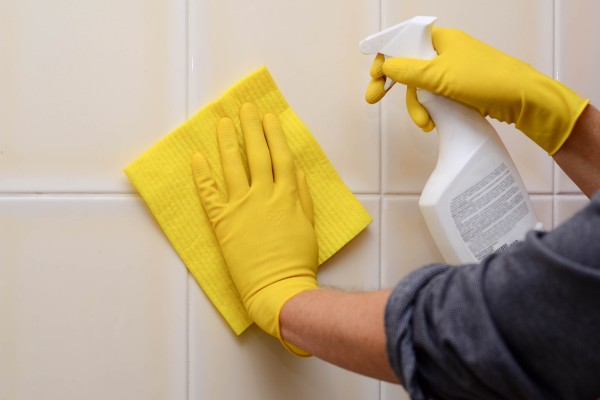
When DIY solutions just don’t cut it, it might be time to bring in the big guns: a commercial tile cleaner.
These store-bought products are formulated to tackle severe buildup that home remedies can’t handle, making them a go-to for stubborn grime that’s taken hold of your shower tiles.
Look for a reputable cleaner that’s non-acidic and safe for bathroom tiles to avoid any damage. Follow the instructions on the label, apply the cleaner, and scrub away. Afterward, rinse thoroughly to remove any residue.
Commercial cleaners can do wonders for those tough spots where dirt, soap scum, and hard water deposits have set in for the long haul.
When it comes to those hard-to-remove stains, a commercial tile cleaner is a quick, effective solution to restore your tiles to their original shine—without the frustration of endless scrubbing.
6. Clean Grout Separately (It Matters!)
If you’ve been neglecting your grout, it’s time to give it some extra attention.
Grout tends to collect more dirt and grime than the tiles themselves, and over time, it can make even the cleanest tiles look dingy.
So, when you’re sprucing up your shower, don’t forget to give your grout lines the love they deserve—they play a key role in the overall appearance of your shower and help prevent scratch tiles .
To clean grout effectively, you can create a paste by mixing baking soda and hydrogen peroxide, or you can use a grout-specific cleaner if you have one. Apply the paste or cleaner directly to the grout lines, making sure to cover all the spots that need attention.
Then, grab a toothbrush or a grout brush and scrub away. The bristles will get deep into the lines, lifting dirt and restoring that fresh, clean look. Rinse thoroughly to remove any leftover residue.
Remember, it’s not just about the tiles—grout plays a crucial role in the overall aesthetic of your shower, so giving it a separate clean will make all the difference.
7. Rinse and Dry the Shower After Each Use
Here’s a simple trick that can save you hours of scrubbing in the long run: rinse and dry your shower after each use.
It may sound too easy, but a quick post-shower rinse can do wonders in preventing soap scum, hair products, and mineral deposits from building up on your tiles. By washing away those residues, you’re stopping stains before they even have a chance to set in.
Once you’ve rinsed the tiles, grab a squeegee or towel and dry them off. This helps reduce moisture, which is a major culprit in the formation of mold and mildew. It’s a small habit that can make a big difference in keeping your tiles shiny and fresh, day after day.
Adding this simple rinse-and-dry routine after each shower can help your tiles stay in top shape, extending the time between deep cleans and keeping your bathroom looking pristine.
It’s like giving your tiles a mini-refresh every time you use the shower.
Keep Your Shower Tile Looking Like New
Wondering how to clean shower tile without the headache? It doesn’t have to be a chore! With the right products and consistent care, you can keep your tiles looking bright and fresh—no matter how tough your water is or how often your bathroom gets used. The key is regular maintenance: just a few easy steps, and your shower will stay sparkling clean with minimal effort.
But if you’re tired of scrubbing and fighting mold, let the pros take over. Modern Maids specializes in expert bathroom cleaning services, targeting every inch of your space—from tile and grout to tubs, toilets, and vanities. We use safe and effective methods to bring that like-new freshness back to your bathroom.
Call us today at (469)-430-8860
Book your bathroom cleaning online now: https://sumitwho.com/booking-page
Leave the scrubbing to us, and let your shower tiles shine without the effort!
FAQs
What is the best thing to clean shower tiles with?
The best way to clean shower tiles is to use a mixture of white distilled vinegar and dish soap. This combination effectively cuts through soap scum and grime without the harsh chemicals. You can also create a paste with baking soda and water to tackle tougher stains, especially on grout lines. Regular cleaning with these solutions can help maintain clean tiles and prevent dirt buildup. For deep cleaning, hydrogen peroxide is an excellent option to remove mildew and mold from both tiles and grout.
What should you not clean tile with?
Avoid using abrasive cleaners, steel wool, or wire brushes on your tiles, as these can scratch and damage the surface. Harsh chemicals, like bleach or ammonia, should also be avoided unless used carefully and sparingly, as they can discolor or weaken tile and grout over time. Additionally, avoid using acidic cleaners, such as lemon juice or vinegar, on natural stone tiles like granite or marble, as these can erode the surface and cause permanent damage.
Will vinegar ruin tile?
Vinegar is a great natural cleaner for most ceramic and porcelain tiles, but it can cause damage to certain types of tile, especially natural stone like marble or granite. The acidity in vinegar can erode the surface, leaving it dull or scratched. For those types of tiles, it’s better to use a mild, pH-balanced cleaner specifically designed for stone surfaces. On ceramic or porcelain tiles, however, vinegar is safe and effective for cleaning grout lines and removing soap scum.
Does bleach damage shower tiles?
Bleach can damage shower tiles, especially if used frequently or in high concentrations. While it effectively removes mold and mildew, it can weaken grout over time, causing it to crack or discolor. In addition, bleach can affect the color of your tiles, especially if they are not glazed or if they are made from natural stone. It’s always best to use a diluted solution and to test it on a small, inconspicuous area first. For routine cleaning, milder options like vinegar or a commercial tile cleaner are better alternatives.