The bathroom—it’s the one space we all use daily, yet it’s also one of the most neglected when it comes to cleaning. From toothpaste stains on the mirror to bathroom tiles, soap scum built up on the shower head, and even trash cans it’s no wonder this area accumulates grime fast. And let’s face it, cleaning a dirty bathroom isn’t exactly anyone’s idea of fun!
But did you know? A bathroom that’s regularly cleaned not only keeps your home looking fresh but also reduces the risk of bacteria and mold buildup, improving both hygiene and health. Plus, if you’re hosting guests, a dirty bathroom is one of the top complaints—they notice the little things!
The good news? You don’t have to face the task alone. In this step-by-step guide, we’ll walk you through how to clean every corner of your bathroom thoroughly, using tips and techniques from our experienced cleaning pros.
Ready to make your bathroom shine? Let’s get started!
What You’ll Need to Clean Your Bathroom
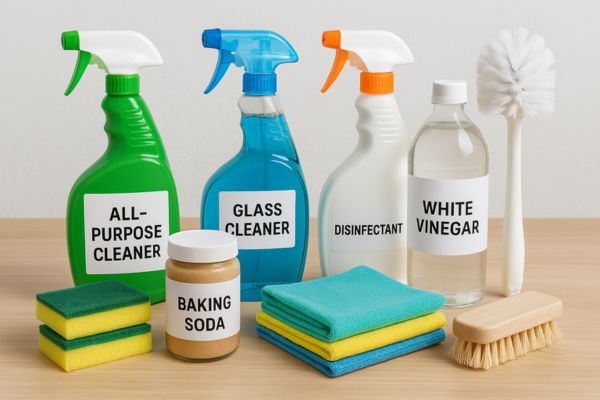
Before you start tackling the bathroom, it’s important to gather the right tools.
Here’s a checklist of the essential cleaning supplies you’ll need to make your space shine:
- All-purpose cleaner – Perfect for wiping down surfaces like countertops, shelves, and sinks.
- Glass cleaner – For streak-free mirrors and windows.
- Disinfectant – To thoroughly clean toilets, sinks, and other high-touch areas like doorknobs and faucet handles.
- Baking soda – Great for scrubbing tough stains and grime in hard-to-reach spots.
- White vinegar – Helps remove limescale and hard water stains, especially on faucets and showerheads.
- Toilet brush – Essential for keeping your toilet bowl spotless.
- Microfiber cloths – These provide a streak-free shine on glass surfaces and are gentle on surfaces.
- Sponges and scrub brushes – Useful for cleaning tile grout, tubs, and sinks.
- Rubber gloves – Protect your hands while handling cleaning solutions.
- Bucket – To carry and rinse water while cleaning.
- Squeegee – Ideal for keeping your mirrors and glass shower doors crystal clear.
- Trash bags – For waste disposal during the process.
- Optional: Essential oils – Add a fresh scent to your bathroom after cleaning.
If you prefer an eco-friendly approach, consider using distilled white vinegar along with non-toxic or natural cleaners instead of abrasive cleaners . They’re a safe and effective alternative that still delivers great results while being gentle on the environment.
How to Clean a Bathroom – Stepwise Process
Step 1: Declutter the Bathroom
Before you start scrubbing away, take a moment to clear the space. Remove everything from countertops, shelves, and the floor.
This includes towels, toiletries, rugs, toothbrush holder, countertop items and any other items that might be lying around. Decluttering not only creates room to clean more efficiently, but it also prevents objects from getting in the way while you’re working.
Start by putting away things you don’t need for the cleaning process, like hair tools and lotions, and placing items in a plastic bag for easier storage.
If you’re cleaning the shower or tub, take out all shampoo bottles, soap dishes, and any bath products that could block access. Move rugs, trash bins, and towels to the hallway or another room temporarily.
This gives you full access to every surface and ensures you’re cleaning the bathroom thoroughly.
As you clear, it’s also a good time to organize.
Consider using baskets or drawers to neatly store your toiletries, soap dispensers, and other bathroom essentials. Not only will it help keep the bathroom looking tidy during your cleaning session, but it’ll also make it easier to maintain organization once you’re done.
A clutter-free bathroom makes cleaning more manageable and adds to the overall freshness of the space.
Step 2: Dust and Sweep the Bathroom
Now that your bathroom is clutter-free, it’s time to give it a fresh start by removing the dust and toilet hinges debris and also remove soap scum that can often go unnoticed.
Begin by dusting the bathroom from top to bottom—this means starting with the light fixtures, vents, and exhaust fans. You’d be surprised at how much dust can settle on these surfaces, and wiping them down first will prevent dust from falling onto areas you’ve already cleaned.
Once the light fixtures and high surfaces are dusted, shift focus to the floor. Sweep the bathroom thoroughly to gather up dust, hair, and any other small debris.
Be sure to pay extra attention to the corners and baseboards—dust loves to settle in those areas. The spaces where the floor meets the walls are prime spots for cobwebs and dust accumulation. You can use a vacuum cleaner if needed.
Pro Tip: To make this process more efficient, use a microfiber duster. It grabs the dust without pushing it around, leaving surfaces cleaner with less effort.
Now that the dust is gone, you’re ready to move on to the deeper cleaning steps that will help you clean a bathroom and make it shine.
Step 3: Clean Mirrors and Glass Surfaces
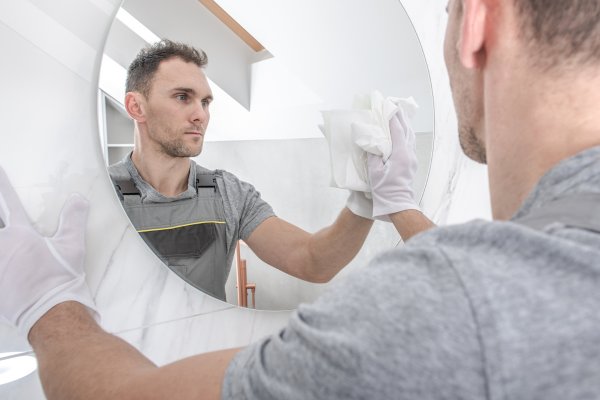
There’s nothing like the sparkle of a streak-free mirror to give your bathroom that freshly cleaned look.
To get your mirrors and clean glass surfaces gleaming, start with a high-quality glass cleaner or even a homemade solution of white vinegar and water. After cleaning, make sure to dry wipe down the surface to prevent excess moisture that can leave streaks behind.
When wiping the mirror, make sure to use circular motions. This method helps ensure you’re cleaning all areas without leaving those frustrating streaks behind.
For an extra polished finish, you can use a lint-free material or microfiber cloth, which helps absorb moisture and leaves a smooth shine.
Shower doors are another spot that can quickly accumulate water spots. To avoid this, make it a habit to use a squeegee after each shower. It only takes a few seconds but can save you from needing to scrub off stubborn water marks later.
Keeping these glass surfaces clean and clear will add to the overall freshness of your bathroom, giving it a pristine, polished look.
Step 4: Clean the Sink and Countertop
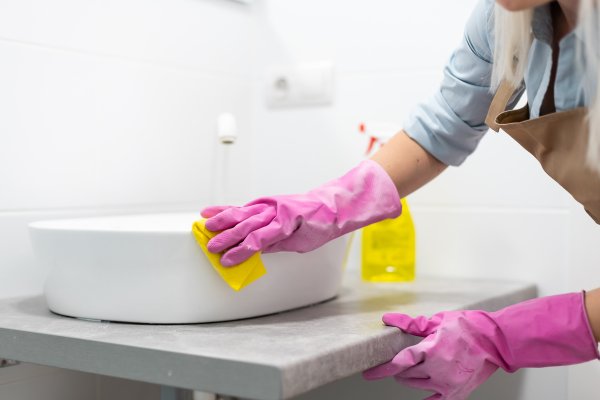
Your sink and countertop are more than just functional—they’re also prime spots for bacteria and grime buildup from daily use.
Soap, toothpaste, and water splashes can quickly accumulate, making it essential to keep these areas clean and hygienic.
Start by spraying the sink, faucet, and countertop with a reliable all-purpose cleaner or disinfectant. Give it a minute to work its magic, breaking down any soap scum or toothpaste residue. Once you’ve let it sit for about half an hour, grab a small scrub brush or sponge and start cleaning.
Focus on the faucet and sink, paying extra attention to the edges where soap scum and grime tend to sneak in. These are the areas that can really show signs of buildup if not cleaned regularly.
Don’t forget about the drain! A small brush can be your best friend here, helping you tackle hair buildup or any other debris that may be hiding in the drain.
It’s a small detail, but one that can make a big difference in maintaining a sparkling clean sink. With these spots freshened up, your bathroom will look and feel more polished than ever.
Step 5: Scrub the Toilet
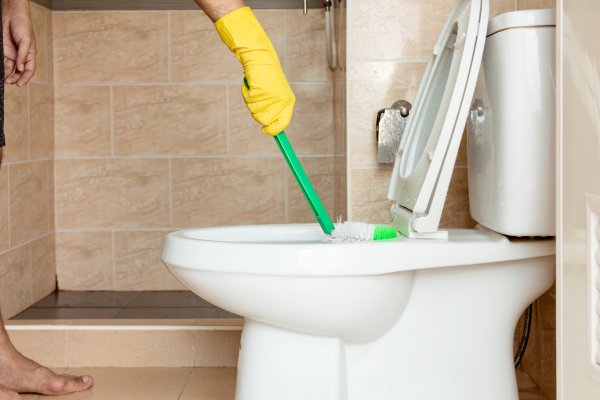
The toilet is one area in the bathroom that demands attention—not just for cleanliness, but for hygiene and odor control.
It’s a task that might seem less than glamorous, but it’s essential for keeping your bathroom fresh and sanitary.
Start by applying a generous amount of toilet cleaner, or for a natural option, use a mix of baking soda and vinegar directly into the toilet bowl.
Let it sit for a few minutes to break down any stains and buildup. Then, grab your toilet brush and scrub the sides and bottom of the bowl. Make sure to get into all the nooks and crannies—this is where germs can linger the most.
Now, don’t overlook the toilet seat, lid, and base.
These areas are touched frequently, so it’s important to wipe them down with a disinfecting wipe or a cloth soaked in cleaning solution. For the finishing touch, use a clean microfiber cloth to buff the exterior of the toilet, leaving it sparkling and looking brand new.
With just a little extra care, including ensuring you’re stocked with toilet paper you can keep your toilet clean and odor-free, ensuring a fresh environment every time you walk in.
Step 6: Tackle the Shower or Bathtub
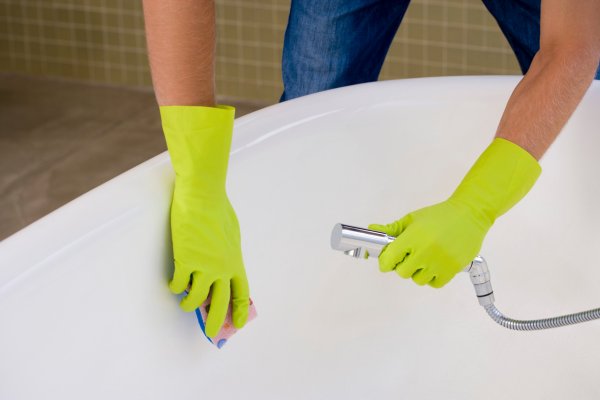
If the shower or bathtub has started to look less than inviting, it’s time to give it the attention it deserves.
Soap scum, grime, and mildew stains can build up quickly, turning a once sparkling clean space into something less hygienic and visually unappealing. But don’t worry—getting it back to its pristine state is simpler than it seems.
Start by spraying an all-purpose cleaner or a bathroom-specific cleaner on the tiles, tub, and shower walls. Allow the cleaner to sit for a minute or two to loosen any grime.
Once it’s ready, grab a scrub brush and go to work. For the grout lines, use a dedicated grout brush or even an old toothbrush to scrub away any buildup—these areas can trap more dirt than you might expect.
For tougher stains or residue, a non abrasive scrubber and baking soda is your friend. Sprinkle it on the tub and gently scrub to lift stubborn stains. Don’t forget the showerhead and faucet nozzles—mineral buildup is common, but a soak in vinegar can help remove those hard water stains.
Once you’ve scrubbed every surface, rinse thoroughly to wash away all the cleaner and grime. Using warm water can make the process smoother.
If you’re looking for a deeper clean, a steam cleaner can work wonders on tiles and tubs, lifting dirt that’s embedded deeper into the surfaces.
A few extra minutes spent here to remove excess dust can make a huge difference in the overall feel of your bathroom.
Step 7: Clean the Floor
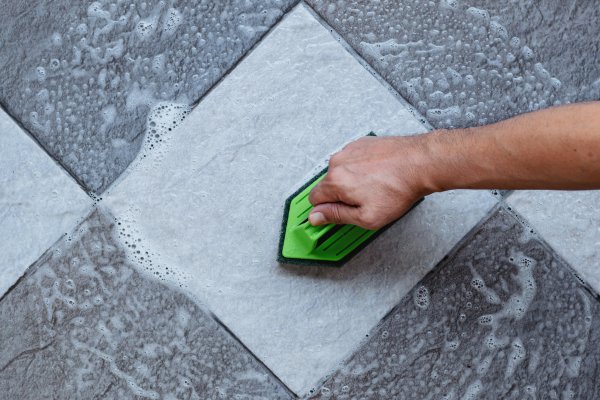
The bathroom floor is often one of the most neglected spots, yet it’s where dust, hair, and grime tend to accumulate the fastest. With all the foot traffic and moisture, your floor can quickly start looking worn down if not cleaned properly.
It’s time to give your bathroom floor the attention it deserves, and layering your cleaning steps will ensure you’re thorough.
Start by sweeping the floor to collect dust, hair, and debris. Don’t rush this step—focus on corners, edges, and behind the toilet where dust tends to gather and hide. Once you’ve swept up the mess, grab your mop and a floor-safe cleaning solution.
Mop the floor, paying extra attention to areas that usually collect grime, like corners and the space behind the toilet.
For remaining streaks, use scrub pads or a microfiber mop to dry the floor. The material will help absorb moisture quickly, leaving your tiles gleaming.
Pro Tip: If you have tile floors, use a mop with a scrubber attachment to tackle any sticky residues or tough spots. This extra step will make sure your floors look clean, fresh, and ready for anything.
Step 8: Final Touches and Air Freshening
You’re almost there! After all that hard work, the last step is all about adding those finishing touches that truly make your bathroom feel refreshed and inviting.
Start by going through the baskets you removed earlier. Tidy up the items inside, like toiletries, and give shampoo or conditioner bottles a quick wipe to remove any sticky residue or soap buildup.
A few moments of tidying up to remove any remaining dirt and cleaning product residue will instantly elevate the space.
Next, replace used towels with fresh, clean ones. Nothing says “sparkling clean bathroom” like a neatly hung towel and organized countertop.
To wrap things up, grab some paper towel, disinfecting wipes and quickly wipe down high-touch areas like light switches and doorknobs. These often-overlooked spots can harbor germs, so a quick swipe will make a noticeable difference.
For any remaining glass surfaces, including those from washing shower curtains take a squeegee and run it across to avoid streaks—this step will give your mirrors or shower doors a flawless finish.
Finally, to give your bathroom that fresh, clean scent, consider using an essential oil diffuser or a pleasant-smelling room spray. A little goes a long way in adding a touch of luxury to the air.
If you want to go a step further, place a small bowl of baking soda in the bathroom to naturally absorb odors and keep the space smelling fresh between cleanings.
A tidy, well-organized bathroom in great shape doesn’t just look good—it makes your daily routines smoother and more enjoyable. A few thoughtful touches will leave the space feeling crisp, clean, and welcoming.
Need a Professional Cleaning? Modern Maids Has You Covered
Let’s face it—cleaning your bathroom isn’t anyone’s idea of a fun weekend activity. But why stress when Modern Maids can handle the entire process? From how to clean a bathroom to ensuring every corner shines, our expert bathroom cleaning services will leave your space sparkling—without you lifting a finger.
Enjoy a squeaky clean bathroom without the hassle. We’ll tackle the soap scum, grime, and dust, so you can focus on what really matters—relaxing in a pristine space!
Ready for a spotless bathroom? Call us at (469)-430-8860
Or, book your cleaning in just a few clicks: https://sumitwho.com/booking-page
Let Modern Maids work its magic. You just sit back and enjoy the cleanliness!